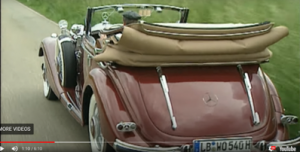
While I have been slowed by doing research and getting side-tracked, so far all has been very enjoyable, progress has been constant, and each set back worked through with ease. But this next stage has been frustrating and seen me revisit my attempts to model the stowed convertible hood 4 times. Before I relate the process let’s look in detail at the convertible roof and more importantly the tonneau cover that is used more often than not when the roof is down. Tonneau covers are used on coupe style cars (and modern pickup trucks) to cover and secure the retracted roof.
The most common style is the soft tonneau made from cloth, canvas or today, vinyl. Some contain rib-like structures to support the fabric and keep it taut. A snap fastening system is also used to secure them as well as inherent shaping of the material. Buckles and tabs may be present to assist in storing the Tonneau when not in use.
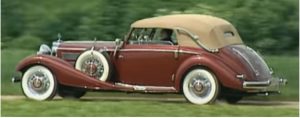
The 3 following pictures are screen grabs of a restored 540k showing the Tonneau fitted, the roof uncovered but down, and then the roof up. Fig 7 from WWII also shows the tonneau in place and this was the most common view of 540ks in use, I have not found any contemporary pictures with the roof down but uncovered.
 |
 |
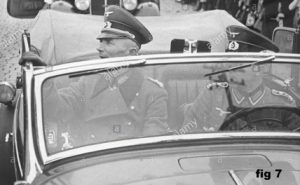 |
I had been struggling to find consistent reference pictures of the 540k in service, as my intro indicated there are a number of possible vehicles, but all belong to different people in varied locations. It struck me that If I could Identify one specific car it might help. This proved to be an excellent ruse as once I had a commander’s name often in the background of his pictures was the 540k. Fig 7 was so useful that I decided to find out who was the commander in the picture. But rather than divert from the task at hand in this article, I’ll put that element of the build in the next article.
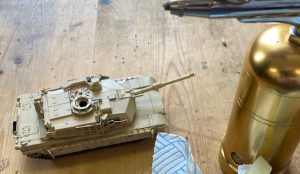
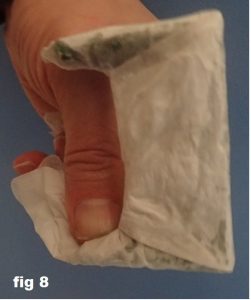 As supplied parts 85 and 86 when joined, are very squared off and lack any ‘billowing’. It also is a plain lump with no seam detail. My first attempt at improvement was to cover the part in tissue dampened with diluted PVA. Too much texture meant I had to rub in some Perfect plastic putty and once dry sanded it back. Painted black this looked passable. That was before I had the picture in Fig 7. This showed that by using the Kit part (even when covered with a layer of tissue) it was still too square. I also needed to add the seams. This time I rolled out some green stuff epoxy putty that can be made very thin. It was terrible as it had to many wrinkles. I decided then to try a thicker tissue that had less texture and fold it ‘origami’ style to have a fold inline with the seams visible in fig 7. Rather than PVA which softens the tissue, this time I allowed Superglue to be absorbed by the tissue which hardened off quicker. If doing this yourself be careful of the fumes that are given off can sting the eyes. Fig 8
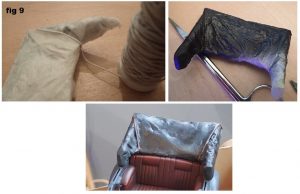 At last we seemed (excuse the pun) to be getting somewhere. Adding the seams went well, against expectations. I had tried some yarn and string, but it didn’t stay straight enough. I had some corded elastic but dismissed this as the elastic tension would pull against the adhesive. I was wrong, out of exasperation I tried the elastic, it’s stretch kept the seam dead straight and the CA loved it, sticking it immediately. A coat of black primer revealed that while better the cover was till too wrinkly, sanding it lightly helped but as the final picture in Fig 9 shows it left a lot of tiny cracks. I wondered if I could get away with it as leather does crack over time, but I had to admit this was bluff as the cover should look like canvas. I therefore purchased a bottle of ‘Mr Surfacer black 1500’ and stippled it over the whole surfaces adding extra on the cracks.
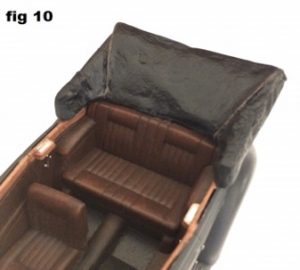 Finally it looked like I wanted. (fig 10).
As this was progressing I decided to tackle the natural wood areas of the car. I knew of a variety of wood decals available on the market but utilising the benefits of being in a model club; asked Richard the Club Chairman if he had any bits left over from his Mosquito build. He furnished me with some off cuts, I didn’t need much but he also gave me some wise advice. The decals are quite transparent so the under coated colour makes a huge difference. Indeed it did, I wanted a warm, rich wood so assumed a reddish brown base would work but that was not so. In the end I made up some test samples (fig 11).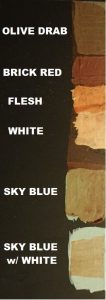
Flesh colour became my final choice as it was a good compromise between a warming red colour but still allowing the grain detail of the decal to be visible. This was applied along the door tops and the complete dashboard. Slivers of chrome sheet were applied for the cigarette ashtray covers. It was only at this point something obvious dawned on me. The Italeri kit was right hand drive! This seemed totally illogical as the car is German, it sold in mostly European countries and Italeri is an Italian manufacturer. Despite my desire to ignore this problem (as would be expected) every picture of WWII German 540ks were left hand. I can only figure that Italeri had used a museum exhibit to get references from and that was an export model.
If I was going to have to swap out the steering position I decided I’d go the whole hog and have a driver figure. Figure modelling is a chore in itself so a dedicated instalment on that bit of fun will follow. Returning to the now completed tonneau all that was left to do was carve out a thin recess to simulate the fitment over the hinge fold and a tiny strap with chrome studs to finish. Not a big and easily seen detail but once added underlines how simplistic the original part was. On reflection I had made it an overly difficult job but I was trying different methods as I went. Like a trifle. If I cut through the cover now it would be a multicoloured set of layers. But like most things in modelling the finish result is just about what I wanted from the start.
Fig 11 Interesting to note that light sky blue revealed more detail of the grain than white. Light sky blue is the colour that the backing paper was. As a colour it wasn’t warm enough to use as a base hence flesh was chosen instead.