This is the last part of the build as the final parts are fitted and also the last challenges. These last few jobs seem to have taken so much longer, not helped by the few weeks of heat and sunshine which have put me off sitting and modelling. The main obstacle to overcome – the Luftwaffe code- is achieved after struggling to find a suitable font, more on that as we go. Tiny details that had yet to be fitted were done including the small glazed apertures on the nose. This was to ensure when further weathering was applied nothing had to be fitted afterwards.
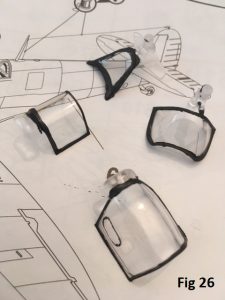
| The canopy also needed to be painted and fixed in place. I painted it freehand rather than use masks, once again to keep down additional costs but also as I felt a steady hand and flat brush should do the trick. I used enamels; a dark grey undercoat followed by Humbrol 30 to match the sprayed surfaces. (Fig 26) Fitting the canopy in place was a little tricky, not least the fear of marking the clear parts. The front windscreen needs it’s extra bullet proof layer added which I did after fitting the main piece in place. Very small amounts of PVA held it and the tiniest amount of Tamiya extra thin around the top. |
 |
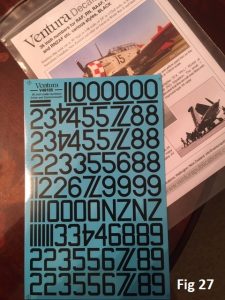
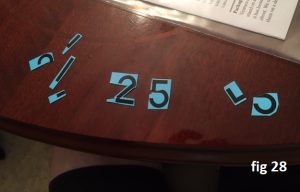
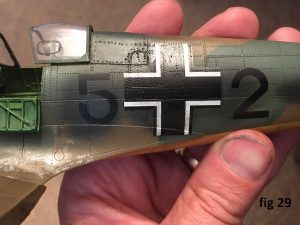
The one area that was a problem was the 5 + 2 serial codes. I’d been able to find suitable national markings from spare decals but the particular font for the numerals was evading me. There wasn’t even an off the shelf decal sheet. In the end I purchased a set of black commonwealth letters and numbers and selected the correct numbers. From there each number was then cut into segments to reduce the lengths of the straight element of the numbers. Finally, these bits were pieced back onto the fuselage and Revell Anthracite, a very dark grey, used to fill in tiny gaps. (fig 27, 28. 29)
 |
 |
 |
 |
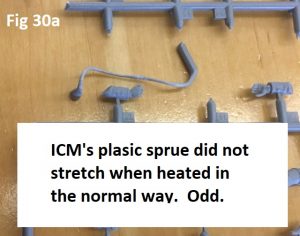 |
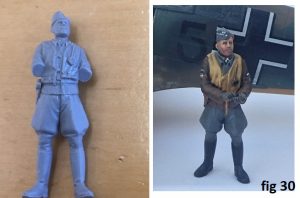
I completed the figure but swapped the head as I used the peaked cap version in another build. The figure was a really nice piece with fine detail. One odd thing though was the plastic didn’t stretch like normal sprue which leads me to think it is a different type of Styrene (fig 30a). I blocked the basic colours in enamel then used acrylics to finish. (Fig 30). |
A myriad of tiny jobs followed, dots of silver on each wing’s nav light then overpainted with Tamiya clear red and green. Affixing the radio mast, decals on the access door and fitting the antenna wire. That was almost a job to far as I successfully snapped the mast twice and was able to glue my finger prior to getting the filament to stick. I had fitted the engine exhausts already but wanted to blend them in with some exhaust staining. What was a surprise was how little staining the Spitfire seemed to make as I looked through a lot of pictures to see how the stains should be applied and in the end went for a short plume with a little whitening at the centre (fig 31).
So the model is finished but I think a final detailed paragraph is needed to explain the Spitfire as it is portrayed in my version as N3277 went through a lot of changes. While 5 + 2 appears in a lot of artwork I’ve been unable to find a photo of the airplane (though my memory is telling me I’ve seen a picture somewhere).
N3277 Spitfire Mk.Ia fitted with a Merlin III was numbered AZ-H and issued to No.234 Sqn (‘AZ-H’, nick named “Dirty Dick”) subsequently damaged by a Bf-109 near Swanage, Dorset but force-landed near Cherbourg with P/O Richard Hardy RCAF at the controls. As AZ-H came into the German controlled airfield it was opened up on by local flak units and some damage was taken behind the cockpit. Hardy was taken as a PoW and treated well by his captors. AZ-H was immediately repainted where it sat on the airfield and these pictures are widely known but sometimes mis-interpreted. At this point all British national markings were overpainted, but the underside colour remained sky and the ‘Dirty Dick’ logo as well as the broken swastika motif was left at this time. It was then sent further into axis lines, repaired, and on to the German Test-centre at Rechlin (now marked ‘5+2’ and painted in the Test colour under-surface of Yellow) based there from December 1941 to September 1942 being test flown by the gifted test pilot HW Lerche. It likely went onto “Group Bernay” in France (5/JG.2*) in 1942/43 then JG.26 at Orleans-Bricy, with a logged report of being flown 29th March 1943 by Oberfeldwebel Martin, subsequent fate of this Spitfire is unknown.
* 5/JG.2 “Gruppe Bernay”, 5th Staffel of the 2nd Jagd-Geschwader (No.2 Fighter Wing in France) also called ‘Jagdlehrer- Uberpriifimgs-Staffel’, a Fighter commander/ leader Training Unit and Flight Instructor Checking Group. This Jagdleher tests and trains pilots in Luftwaffe aircraft but also with Spitfires and other captured aircraft. Reportedly Spitfires were at Orleans-Bricy and Le Bourget, dett Bernay and Villa Coublay in France. Spitfire Mk.Ia marked ‘5+2’, was used for comparison flying tests against Bf 109 and FW I90s in October 1942. Another Spitfire was here in April 1943, marked ‘3+9’.
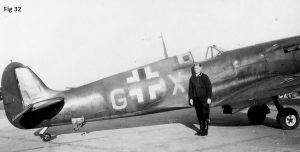 I used the disruptive scheme of Green and Brown with sky underside applied in correct RAF style as shown on pictures of ‘Dirty Dick’. Continuing its journey, I then overpainted the National insignia as well as the tail rudder and the other motifs in German Luftwaffe Black grey. The whole underside was painted in Luftwaffe Yellow RLM 04 but I didn’t do the rudder as many captured aircraft exhibited. This was a choice made after seeing a picture of a Spitfire marked very similar to 5 + 2 in Luftwaffe service (Fig 32).
I missed the club deadline but did enjoy the build for the most part and hope it is a worthy entrant in the Spitfire group build.
Sibo
