Roland “Bee” Beamont’s Hawker Tempest by Nick W
 I imagine that Roland “Bee” Beamont needs little introduction. His exploits as a WW2 fighter pilot are well known, spanning almost the entire conflict from deployment as a Pilot Officer to France in 1939 with 87 Squadron, to chasing V1 flying bombs as a Wing Commander in the summer of 1944. In between he spent a period of time as a test pilot with Hawker and oversaw the introduction of both the Typhoon and then the Tempest to RAF service. Post war he worked for English Electric and test flew the Canberra, Lightning and TSR2.
What I didn’t know about him until relatively recently was that he used to own a house in the village of Pentridge, between Salisbury and Blandford – where a friend of mine (with a keen interest in military history) now lives. As model makers I think we sometimes like an excuse to build something for someone else, and this seemed like an ideal opportunity to put a model of one of Roland Beamont’s aircraft into the house where he used to live.
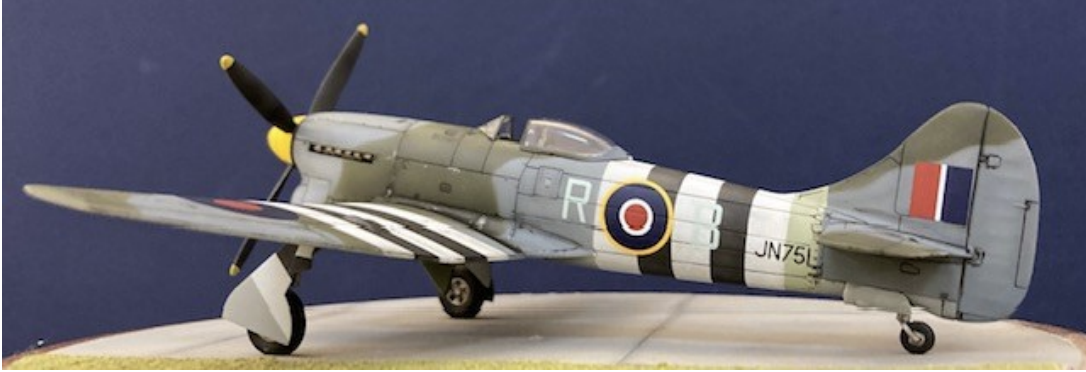
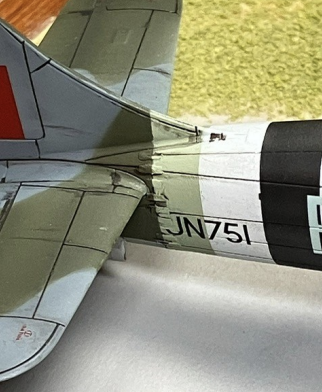
Airfix made the task significantly easier for me by releasing, in 2022, a new tool 1:72 kit of the Tempest Mk V including s/n JN751 in Roland Beamont’s markings. As a Wing Commander his aircraft carried his initials rather than squadron codes.
My copy of the kit came cleanly moulded in Airfix’s now older style pale grey plastic. There are options for wartime and post war wheels and tyres, drop tanks in clear plastic – also a post war option I think – a choice of two spinners and a pilot figure. The builder also has the choice of “gear up” if they prefer. The total parts count is 72.
Building the kit is relatively straightforward. The cockpit features a seat with a nicely quilted backrest but no harness. The compass and gunsight are a single clear piece that attaches to the rear of the instrument panel – but I found the gunsight interfered with the fit of the windscreen later in the build and some of it had to be snipped off. There is a decal for the instruments. With the cockpit opening of a Tempest being particularly small and most of the interior being black, you will see very little.
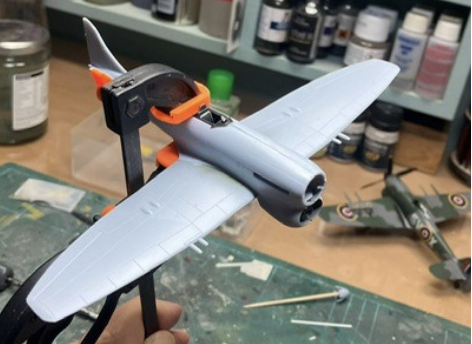 A small amount of fettling was required to get the large chin radiator to fit snugly into the lower nose. I was happy with the fit of the wing roots to the fuselage on the upper side. Underneath there is a bit of a step behind the trailing edge of the flap on one side, but not the other. Viewed from head on I did have to manipulate the tail planes a bit to get everything looking “square” – but overall, I would say that construction was pretty simple.
I’m not the most diligent of researchers, but a quick Google of JN751 revealed that it was from the first batch of 50 Tempests built. As such, its fuselage had been constructed as a Typhoon and would have had the distinctive reinforcing “fishplates” around the rear fuselage. I cut some micro strip into tiny rectangles, glued them on and then sanded them until they almost vanished. Another quirk resulting from the Typhoon fuselage was that the mating point where the main wing spar meets the fuselage was designed for the much thicker Typhoon wing. As a result, there was a bulge at the wing root on each side that covered this attachment. I reproduced these with a blob of carefully applied Krystal Clear. With these modifications done it was time to apply some paint.
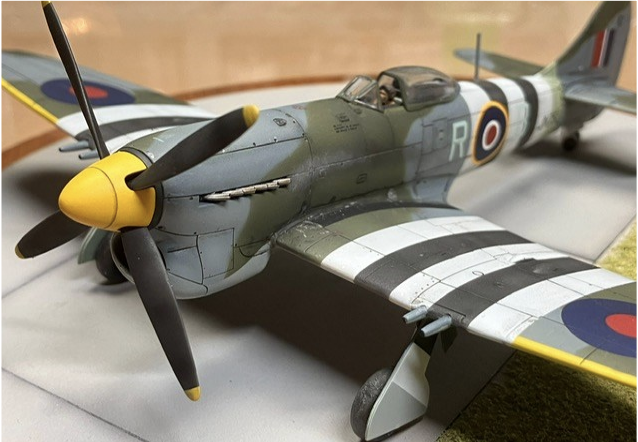
 Recreating Beamont’s aircraft means D-Day stripes. Airfix provide these as decals – but such large areas of pristine decal never strike me as looking quite right so I decided to paint them. When added to the sky fuselage band, the three main camouflage colours and the yellow identification stripes on the wing leading edges (which Airfix also supply as decals, but which I also elected to paint) and the spinner, it makes for quite a complex scheme!
After my usual pre-shade of the panel lines with Tamiya Nato Black, I started with the Sky fuselage band as I felt it would be easier to mask this off first.
After the Sky came the white, with which I covered the whole area of the D-Day stripes and used this as an undercoat for the yellow wing leading edges. It is very convenient that Tamiya 6mm masking tape is exactly the correct width for the D-day stripes, although the tapered shape of the fuselage meant that I used their 2mm tape for curves to set the edges for these. (As Airfix note in their instructions, the foremost white fuselage stripe is slightly wider than the others).
Once the white sections of the stripes were masked, I sprayed Nato Black, taking care not to apply too much paint and allowing some contrast between the panel lines and panel centres. With the stripes complete, I masked out the black and then moved on to the yellow leading edges. I toned down XF3 (yellow) with a little XF60 (dark yellow) for these. 2mm masking tape was used to cover the yellow and I moved on to the main camouflage colours. Once again it was Tamiya paints, starting with XF83 Medium Sea Grey for the undersides. The superb fit of the “gear up” optional undercarriage doors provided a ready-made mask for the wheel bays. Yet more masking tape set the sharp demarcation between the underside colour and the upper surfaces. The curve from the front of the wing leading edge down and across the chin radiator was the only tricky part of this exercise.
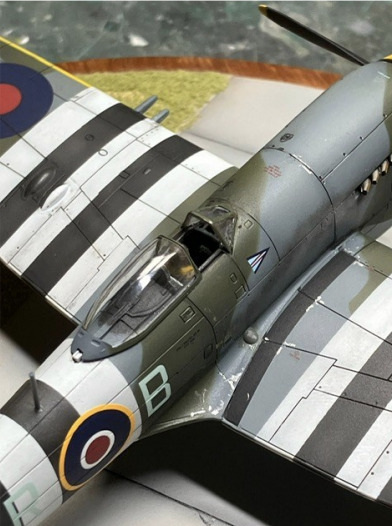
 Next up was XF82 Ocean Grey, with which I covered all of the relatively small area of the upper surfaces that weren’t already painted. After leaving this for at least 48 hours, I broke out the White Tac and rolled numerous thin sausages that I used to mask the curves of the upper camouflage scheme, following Airfix’s instructions as closely as I could. I infilled the parts I wanted to remain grey with Humbrol Maskol. The final colour was XF81 RAF Dark Green. I tried to spray this at a right angle to the White Tac sausages to create a tight border between colours – I wanted a sharp but not razor sharp line. As the green was being painted over the Ocean Grey the pre-shading was largely lost and so I darkened the green a little with some Nato black and went over the panel lines again to reintroduce some contrast.
At this point the model looked a mess, being covered in tape, White Tac sausages, purple Maskol and green over-spray. But that made it all the more satisfying to start removing all the various masking and reveal the finished scheme. There were one or two inevitable touch ups before I glossed the model with a 50:50 mix of Mr Color Self-Levelling Thinner and Tamiya X22. As is usually the case with Airfix decals these days, they were superb. There was a surprisingly large number of stencil type markings to add. All came away from the carrier paper quickly and easily and with a little Micro Sol they all settled into the panel lines.
 After the decals I followed my usual procedure of applying a Flory panel line wash. Some will say that the effect is too stark and unrealistic – but I just really like the way it looks. Perhaps, on the white sections, I could have used a paler wash…? Before applying a matt varnish I decided to add the undercarriage (this was well designed if fiddly to install) and the most satisfying part of many a model aeroplane, the prop and spinner. The matt finish was my usual 50:50 mix of Xtracolor matt varnish and white spirit.
I really wanted to add “Bee” to the cockpit. Airfix’s instructions suggest the pilot can be added at the very end – but this is not as easy as they suggest. His arms were too wide for the cockpit opening and it required some rather drastic surgery to allow him to be inserted at an angle and then rotated to face forward, but he did eventually go in. I applied some exhaust stains with black and white pastels, added the ariels and the sliding canopy and it was done!
I loved this kit. The fit was pretty good and although the paint scheme was quite involved, it just went well and was one of those kits where things came out as I hoped. I would thoroughly recommend it.
 |
 |