 Having built two of these this year, I thought I might share the experience with you…
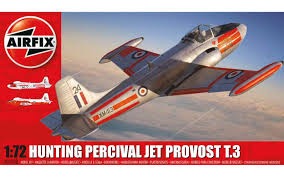
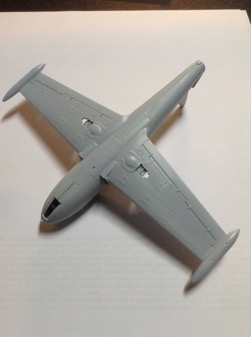
The kit is one of the “new breed” of Airfix releases, available as a standard model with two RAF trainer schemes, and as a starter set in “Red Pelicans” aerobatic team livery, with paints, glue and a brush. It costs about £10.
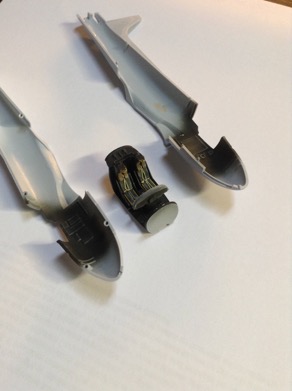
Panel lines are recessed and the plastic is quite soft and easily worked. There are two separate canopy sections to cater for open and closed positions, and different undercarriage parts for raised or lowered gear. Two pilot figures are included, in which case the ejector seat cushions and firing handles are left out.
Those of you who were at Sibo’s “FlashMod” event might recall that I had a bit of a nightmare with the “dayglo” orange markings on the box top trainer scheme – they took an eternity to come away from the backing paper and simply would not conform to any curved surface. If I were trying this scheme again I would either use aftermarket decals (there is a very similar scheme on Xtradecals sheet X72250 – as well as several other colourful options) or try very hot water and the most powerful decal setting solution you can find.
For the second build (the subject of this review) I avoided the problem by opting for the red/white/grey scheme, and as it is intended for a strictly “out of the box” competition I used no aftermarket products at all.
 How many reviews have I read that start with the cockpit? Well, predictably enough that is where construction begins.
The ejector seats are well detailed for the scale and, if you leave the pilots out (as I did) there are harnesses, overhead seat firing handles and cushions all represented.
The instrument panel is a decal, but a fairly good one. There are control columns, and even a throttle. Some detail is also moulded into the sidewalls, and on the “decking” behind the seats.
I airbrushed the parts with Tamiya NATO Black, before picking out the seat details with Humbrol enamels and dry brushing the raised detail with very pale grey.
It wasn’t long before the fuselage halves could be joined. Generally the fit of the kit is very good.
 The one area that required a little attention was the fuselage seam under the cockpit. A little sanding of the tub, and in particular the front bulkhead, helped to minimise the gap, and a small amount of Squadron Green took care of the rest.
The one piece lower wing needed a little care to ensure it fitted neatly around the stepped front end. The inner undercarriage doors are correctly moulded closed, even when the gear is down and so the wheel wells are small and easily painted after the main colours are on.
In the photo you can see the small line of green filler under the cockpit.
Assembly followed quickly. The two upper wing pieces are a very good fit – especially at the root – the seams around the wing tip drop tanks need careful sanding to avoid a visible line.
I added the rudder, but left off the tail planes and elevators to make masking the paint scheme easier – they are in one piece and slot in easily at the end of construction. Likewise I left off the tail pipe.
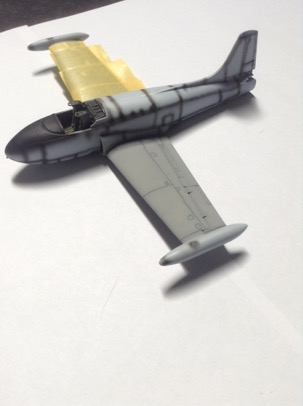 To paint the model I didn’t think primer was needed and so went straight to Tamiya flat black and pre-shaded the panel lines and covered the anti-glare panel in front of the windscreen.
Next up was the light aircraft grey for the wings and part of the tail planes. I tried to control the coverage to just allow a little of the black shading to show through, but without making the subject look too dirty – a subtle shadow to highlight the panel lines was what I was after. Again, I used Tamiya (XF19) thinned with their own product as I find they spray really well through my airbrush – fine, even coverage without clogging the tip of the needle.
As befits an RAF trainer scheme, with lots of sharp edged areas of colour, I did end up using rather a lot of Tamiya tape to mask off the remaining colours. Having given the grey a chance to dry, I protected the wings and went for the white. I aim for a paint to thinner mix of about 50:50. No surprises that it was Tamiya (XF2) and, again, I tried to let a little of the black shading show through. As I was going to be finishing the model with the canopy open, I was able to use the closed option part to mask off the cockpit.

Having looked closely at the anti-glare panel once painted, there was the faintest trace of a seam, so I rubbed it down and decided to repaint it once the other colours were on.
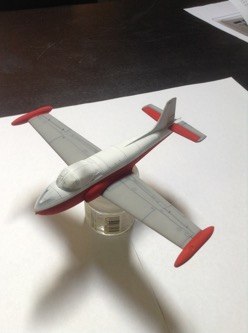 Half a ton of tape later and the red (XF7) was on. I would love to tell you that each colour only had to be used once, but that would be far from the truth. I was too quick to mask the white, so a couple of small patches came away with the tape and had to be redone. The first line I masked between the red and white was too low, so the red had to come out again, and the area around the base of the rudder needed all three colours to be re-used at least one more time to eventually get this right. Re-doing the anti glare panel also needed two attempts.
Luckily, the repairs and resprays blended well with the first coats and did not spoil the finish – did I mention that I really rate these Tamiya paints?
For the jet pipe, I first sprayed it with (Tamiya, of course) gloss black acrylic (X1). I followed this with Alclad chrome to reproduce the shiny finish I had seen on many photos of the JP, and then finished it with a small amount of Alclad’s “jet exhaust” around the inside and the lip of the pipe.
Finally I was able to say that the paint was on and I protected it with a couple of coats of “Klear” floor polish, sprayed through the airbrush.
Once the Klear was dry I used Micromesh polishing cloths to create a really smooth surface. I use them with water and as gently as I can to avoid going through the Klear and into the paint – particularly on any lumps and bumps on the airframe.
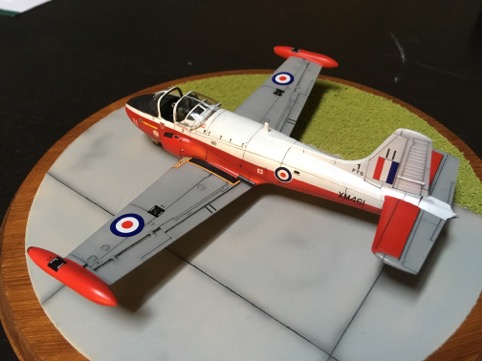
And so to the decals. The decal sheet is well printed, if a little intimidating thanks to the tightly packed full set of airframe stencils. Whilst I always start with a small decal, usually on the underside, to see how the rest will behave, I then tend to try and place the larger markings first, like the underwing serials, as these provide a useful guide for the placement of many of the smaller ones. I find really hot water tends to soften decals and helps them conform to any awkward shapes, and I use Microscale’s “Microsol” (the red one) or, for the really stubborn ones, Walther’s “Solvaset”. The kit decals were straightforward to use this time – they conformed to surface detail like the fuel filler caps and the carrier film disappeared on the smooth surface. It took a while – there are thirteen decals on the underside of each wing alone, some so tiny they can hardly be seen, but eventually they were done.
Next came a coat of Xtracolor satin varnish – except the anti-glare panel – to seal in the decals and protect them, and also to ensure that they and the paint have the same finish.
After brush painting some of the detail, like the navigation lights, and fitting the undercarriage, I then used a Flory “dark dirt” wash to highlight the panel lines. Although you can slather this all over the model and wipe off the excess, I find that, particularly for aircraft that were quite clean in the first place, applying it to the panel lines with a fine brush saves a lot of mess (and a lot of wash!)
To complete the model I attached the open part of the canopy with Microscale Krystal Klear and added the two blade ariels.
I have to say I really enjoyed building this kit – even though it’s not 1:48 scale, nor Fleet Air Arm! The fit was very good, it’s not too complicated and the decals for this scheme, although time consuming due to the sheer number, went on beautifully – but beware the dayglo orange of the other scheme as mentioned above. I would thoroughly recommend it to anyone who wants a relatively quick and easy build to produce a colourful addition to their collection.
Nick W