S.D.R Recon.
Intro
 My second group build was already in mental gestation when the GB suggestions were asked for; I had therefore a vested interest in voting for the ‘Airfix Vintage Classics’.
Using the fact that the Beach Buggy has a VW chassis and the link to Kubelwagen in the past meant a Recognisance vehicle based on this kit was already on my ‘what if’ build lists. Add my love of Maschinen Krieger and that Hasegawa have some lovely 1/35 armoured fighting suits that would look perfect alongside it was obviously going to happen, the question as so often pointed out by the club is ‘will it happen in time?’ Despite stating I would be resting form dioramas after completing my last I have also realised this will need a diorama to get the ‘Reccy’ story over. So here we go.
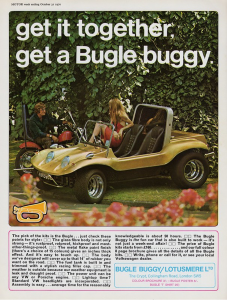
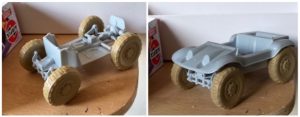
Some background on the kit is probably in order. Re-released in the Vintage Classic boxing for the first time since 1979, Airfix’s 1/32 Beach Buggy comprises six sprues one of which is clear and bagged separately plus a separate body (detached from a runner before boxing so nips are still visible). The internet has gone mad on how no flash is evident, with just minor seam lines requiring neatening but I found a lot of injector marks to contend with. The real vehicles built by the Bugle company employed a glass fibre body over a chassis and engine taken from a VW Beetle – the body is simple and replicated faithfully by the upper section, while the remainder is a credible, if simplistic recreation of the air-cooled engine, Nick Williamson spotted it straight away as an VW aficionado. The wheel hubs are soft in detail and the tyres lack tread except on the very edge, but mimic the slicks you might see on track cars. Overall detail is good in the moulded interior. A bikini-clad woman and moustached, well toned driver are supplied probably some of the best figures from that era I have seen, the pose of the lady is great rather than a seated dummy. Instructions for colour are simple – a lot of Silver for the engine which would not look realistic at all. Bugle Manufacturer decals and a choice of number plates.
Wheels and tyres, seats, figures and decals, as well as painting instructions were of no concern to me as these models would follow my own direction as well as a number of modifications. Twice! As I was doing two vehicles along with some others for the dio.
A final note. In real life Bugle and Manx both made kits for using VWs and converting to beach buggy style. Add to this that it could be built in kit form at home the variation is wide which does give me some scope too. I’ll add some real examples as the build notes go along illustrating this. Also the Beetle engine changed a lot through its life so once again I can go with whatever picture reference I like. In the model a lot will be hidden from view so I won’t be spending lots of un-necessary time on the engine but want to lift it a little.
Most of you will be familiar with the Roy Cross art work on the box, visible on the GB cover page but below is the original vehicle sales sheet.
S.D.R Recon VW Buggy
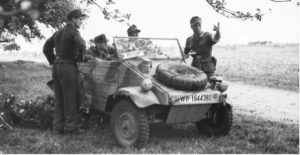 With the intro out the way it is time to get into the build. Some research was done on WWII Kublewagens to get some design cues as well as looking at various kit built (life size- not model form) Beach Buggies.
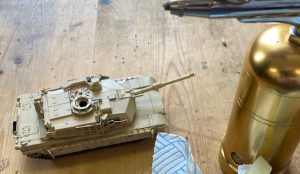
The first and most important consideration was the wheel set up as the kit wheels were not really rugged enough and did not give the sort of ground clearance I would expect for a reccy vehicle.
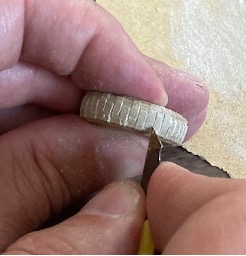
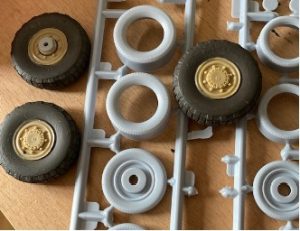 Finding 10 wheels was needed ( 8 for the buggies plus 2 for carried spares). I found 9 so I was happy to go on. The wheels come from Italeri 1/35 LAV’s. These two part wheels have always ended up in my spares box as the tread pattern looks nothing like the US Michelin XML I believe they are supposed to represent. Now they can be used freely, well once the terrible seam line is removed and the tread pattern rescribed into the tyre edge.
 A test fit proved the bigger wheels would need to have the axels and suspension adjusted to give clearance for the body. The front was easily done by make the units as per the instructions but instead of using the central mounting holes, I used the top face and mounted the units to the chassis base that way. For the rear, the axels came directly from the engine so a quick snip at the hub let me bend the axel down to a new mounting point. From there a new hole was drilled horizontally and carbon rod inserted. This would become a strong mounting point for the rear wheels.
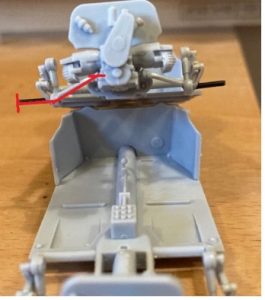 The red line on the photo shows how the axels are now shaped as if using UJ’s to transfer the direction.
The interior of the buggy was emblazoned with the Airfix logo that had to go. VW Kublewagens had wooden slat floors so I added my own and used solder for cables from the front lights to the battery at the rear. A steering column was lacking so a hole was drilled in the bulkhead to add one from sprue. The 1/32 Recaro style sport seats were discarded as my vehicles would be 1/35 and I thought a more basic style utility seat more in keeping with the military theme. 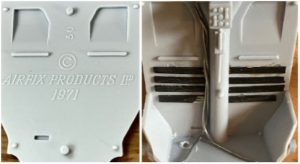 The higher ride height meant the front was far more visible and in a sense vulnerable in a real world sense. Using lengths of sprue I made a simple bumper, very similar to that of the Puma A/C. I extended the front steering supports with square plastic rod and then using spare trunions from a Challenger turret, some sprue and nylon thread made 2x winches to fit at the front.
 These details are not glaringly obvious but fill the open front end and add realistic details. It felt right to prime the assembly so far. I realised then that the front assembly looked exposed and fragile and would be prone to damage in an operational environment, a real problem for the Fast Attack buggies trialled by SF in Iraq. Some fine angle strip created a support frame, and a guard was made from 10 Thou plasticard. Airfix provide a similar item to protect the rear engine area. Some treadplate beefed up the centre line.
I didn’t enjoy assembling the engine, small parts with big sprue attachment points and minimal detail. I left all exhaust parts off. Partly to ease painting but to be honest I thought they looked terrible so am thinking of using metal and plastic tubing to do something better.
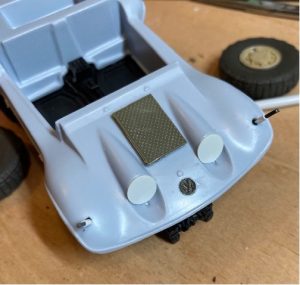
While I am making 2 of these Buggies, they will have different roles and therefore different equipment fits. A enjoyable rummage in the spares box found some German radio sets in resin and a plastic MILAN firing post that while simplified would be a good starting point to modify as a pintle mount. I even found a MILAN ammo tube but that will need some work- it helps that being a MILAN operator for over half my career will allow me to get things right. The biggest error is the tube has its protective cover still in place which should be removed if fitted, or if in stored state an additional two end caps should be present. I’ll come back to this as the build nears completion. For commonality both buggies will have a dash mounted MG. I wanted to mount the spare on the front like the Kublewagen but the gap between the head light bulges prevented that so spares are to carried on the rear like a Willis Jeep. Instead reinforced tread plate been mounted on the front below which an ideal location for the distinct VW logo. Soldiers use anything at hand to clamber on so the tread plate made sense, it is often seen on land Rover bonnets for the same reason.
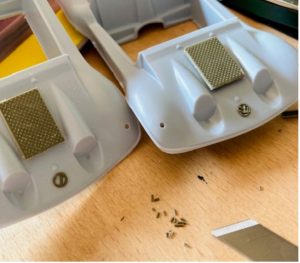
Making the VW symbol was tedious but necessary. I’m sure I could have bought a Phot Etched set that would have looked far better, but why chuck money at a Group Build? Instead I cut the centre from two hand wheels and then used tiny slivers of sprue to make up the distinct VW symbol. It is not perfect but hints strongly at the real thing. I added spacers on the light bulge fronts. The head lights will be covered in canvas with a slit for night driving so I shall use ‘Green Stuff’ putty and work on these separately before fitting them. The kit has small clear pips for indicator lights. I made use of the locating holes and used plastic covered wire to make the width indicators that were an feature of many light skinned German vehicles. I striped of the coating apart from a short cylinder to make these. Black CA which has a small amount of flex was used to fix in place as I just know this detail will get knocked many times during construction. The tiny white ball ends can wait till the end.
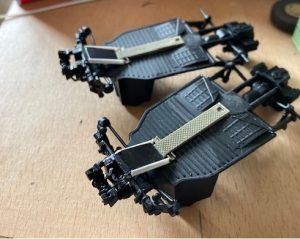
 More test fitting has the body able to be fully removed while building continues which will help with interior painting and the fitting of the seats. 4 rectangles of 40 Thou plasticard were cut out for seat bases and attached to the frame which was left over Photo etch from a tank set. Extra supports from angle strut beefed up the back. More ‘Green stuff’ was rolled extra thinly for the seat cushions and shoulder supports.
So 1x armed scout, 1x radio comms vehicle; a perfect set up for a Reccy team half way to completion. The diorama idea will make more work so for now I’m concentrating on the vehicles so I don’t get distracted and fail to complete the key elements of the Group build.