Break into Stalingrad Sept 42
Click here to read the Final Part of this Build
Part 1
The Club group build for this year was right up my street as I love dioramas. Once again committing was delayed by having too many ideas. My final decision led to me tackling a difficult RPM kit which has been slow in progress.
Never one to concentrate on a single model at once I thought a simple quick build along side would keep my enthusiasm for the group build alive. The side line build has been so rewarding it has overtaken my main entry and continues to keep my attention, I doubt any progress on the other build will happen again until this diorama, titled ‘Break into Stalingrad’ is finished.
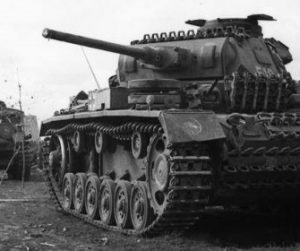
As said, I was looking for a quick fix as well as knowing I’d always harboured a desire to create a Stalingrad based model. I had planned something bigger but the A4 challenge was here so why not see what I could do. I knew it would be hinting at the factory environment and I had a lot of atmospheric colour pictures from the book ‘Onslaught’. All this pre-planning had led me to have a lot of bits and pieces available to choose from for the diorama. I also had courtesy of club member Nick Williamson, our dedicated Fleet Air Arm builder, a part finished Panzer III Ausf M.
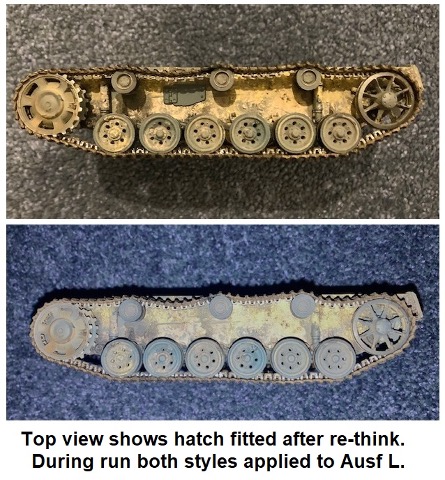
What he had built so far was immaculate, but time had seen its tracks broken off. It was basically painted in ‘DunkelGelb’ the later war years German Yellow. No tools or additional add ons were in place. I knew the ‘M’ variant was too late for the late 1942 Stalingrad period so I decided to back date it to an ‘L’ thinking just the exhaust area would need converting. I later had to revisit other areas as I realised further changes where needed or seemed more logical. The difficulty (other than I wasn’t going to spend my whole life on research) was the Panzer III Ausf L went through a lot of changes during its short run. My initial conversion correctly showed it with modifications done at the assembly plant in Germany. But a number of Ausf L had started as Ausf J builds that turned into ‘L’ before they had been finished at the factory, plus you had those modified to L standard in the forward based field workshops. Plausibly a late production Ausf L without side escape hatches, forward turret visors and no smoke dischargers with the simple exhaust system existed within the dates of my diorama. But knowing that the supply chain to Russia was over extended It was doubtful if one of the last Ausf L off the production line would have been at the front in time. So I added further changes to make one of the earlier Ausf L.
Lucky for me nearly everything I needed to make these backdating changes was still in the box, noted as Dragon is for having so many spare parts in their boxes. Hence my Panzer III appears with hull fitted side escape hatches, simple intakes, simple exhaust and no forward visors on the turret sides, smoke discharges were left fitted. The next modification was to the suspension.
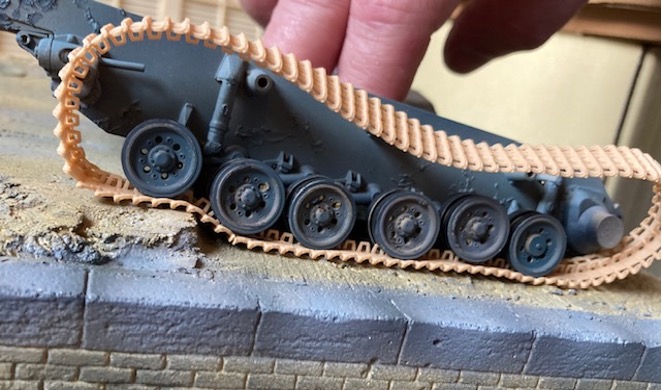
The Dragon kit has suspension arms directly moulded in place. I wanted a more dramatic pose than the level stance this offered. But I did not want to saw off all the mounts for the wheels or have to strengthen the joints once reattached. My clever solution does not stand up to scrutiny but as the pictures show from most angles looks the part and the more dynamic poses is defiantly better.
Poly caps made removing all the wheels, return rollers and sprockets easy ( the fragile nature of the drive sprockets did mean a rebuild was required). The road wheels then had a second mounting hole drilled between the rim and the centre. This then became the mounting point but with out a poly cap glue was required to keep it fixed in place. Being offset from the centre meant by rotating the wheel it would either be higher or lower than it original position and any point in-between. Any Mathematical engineers in the club will immediately realise that the radius of the suspension swing arm is different to the radius of rotation on the wheels I had drilled. Hey I can live with that! And as the gap between wheels was kept uniform it is not immediately apparent that the suspension orientation is wrong. I call that a win as the pose and interaction with the ground is far more important. The broken individual track link run was replaced with Dragon DS track. The broken track would be used later on the hull.
 |
 |
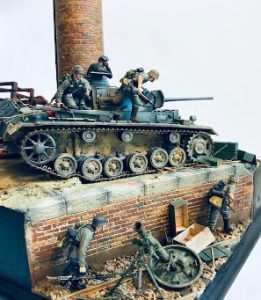
The pose was important as any diorama should tell a story. I wanted the frantic rush of a Mechanised Infantry attack to be conveyed. The Panzer has stopped suddenly after crashing into bits of Soviet equipment, it’s nose-down attitude a combination of braking and the factory floor having a step in it. The carriage from a 120mm Mortar has been jammed under the nose of the Panzer, the Mortar still in position on the narrow-gauge railway, Russians having fled. German soldiers pick their way forward.
 The colour needs some discussion I think. At this stage all things in the Whermacht were still in Panzer Grey as the order to change to Dunkelgelb came into effect in February 1943. Though over painting with mud was common in Russia leading to many non-grey looking photos. Also some equipment was diverted stocks from North Africa so painted in what has been called ‘Tropical’ colour. This is the sand and sandy green camo scheme as seen on Tiger 131 in Bovington. None of that really matters, it is fair to say that all vehicles involved in the break into Stalingrad would have been in Panzer grey (Dunkelgrau to use German naming convention).
My Grey is deliberately a lot bluer than the Panzer grey found in most paint pots. I wanted to mimic the pictures I’d seen in war books as a kid. When colour pictures were used they appeared much more vibrant and a lighter blue grey than is historically correct. This is most likely due to film deterioration that caused shifts in how the colour appeared once pictures were developed.
 I mentioned that I kept the smoke discharges fitted despite thinking that by now they would have been removed from most Panzer IIIs. Modification dates in German text relating to the smoke grenade launcher show it was still a weapon in service at this time, so it fits into the diorama scene. Plus I like how they look. The Dragon kit supplies the cups already filled with the grenade in the ready to use position. A bit of research was needed to what they looked like. Only a tiny set of 6 circles on the model but I wanted to get it right. A very detailed web site came to the rescue that goes through all types of German WWII grenade. https://www.bergflak.com/m24nb.html
From that site I gleaned the following; Nebelkerze S (meaning Fog Candle or commonly smoke grenade). Weight 1.7 kg. Dark green with 2 white lines above each other and the text “Nb K S”. For mechanical ejection from combat vehicles the grenade was enhanced with an ejector charge in 1942 for better functionality which also proves it was in use in 1942 at the time of my diorama. Handheld use was prohibited as initiation could harm the user. With all this info I would just need to paint the circular indents green and be done.
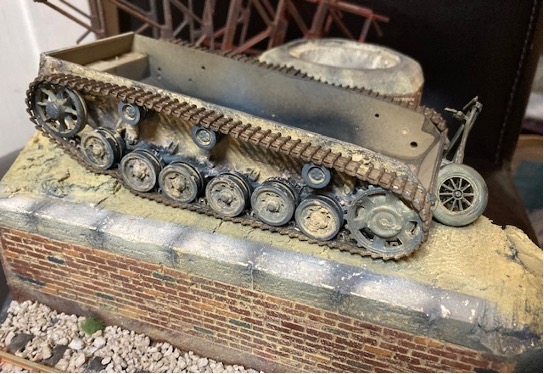
The base was simultaneously built, the size already dictated by the group build, but the different ground levels needed to be identified early on so as to have the suspension and the figures interact with the setting properly. It was important to have everything fit tight even if some of the figures were to be straight out the box. I wanted hands to connect with surfaces and bodies sit into the ground rather than hover over it. That takes more planning and constant checking. Balsa wood was used to edge the base on 3 sides the resulting space filled with dense foam sheet. The 4th side was left at base level. A brick wall from plaster edged the raised area with train track laid on ballast occupying the lower corner.


I used O gauge track which is scaled at 1/43, to small in scale for conventional rail but this meant it was suited to be a factory narrow gauge railway. To keep the base neat, I ballasted the track separately then cut it to shape to fit the base and glued it in place. This lower area will have a 120mm mortar set up. This kit by Zvezda was simple enough to construct though it lacked positive locating points. The large base plate of the mortar would have settled into the ground as it was fired. I used a Dremel grinding tool to flatten the ballast in the area to ensure it looked like the 120mm was of sufficient weight to sink into the ground.
 The raised area of the factory is split into 3 areas, an open area for the vehicle that is stepped hence the need to adjust the suspension. A kiln with a chimney occupies a central to edge area that gives the diorama a great deal of height. Finally, the opposite side has a mass of fallen metal work made from parts of a diecast crane cut up with an angle grinder and reworked with a central pipe and external ladder.

The pipe started as an outflow pipe made from UPVC. Heating it allowed it to be twisted and strips of plasticard glued in rings added detail. Room was tight so constant test fitting was carried out. The open area for the Panzer is tight and the fallen gantry needed to not be parallel to the edge which ate into the A4 area.
The constant test fitting allowed me to refine elements, the 120mm mortar cradle has been placed as if the Panzer has smashed through the position, becoming trapped under the nose down attitude of the tank. As each element is contemplated the problem with dioramas became more acute. Every action is telling a story, so the detail needs to be present. Having the overrun Russian mortar means also having ammo, crates and the other debris from discarded equipment. Only 2 crude ammo boxes were in the Zvezda kit so some scratch building will be needed there. Initially fast construction has now slowed as the detail is tackled as well as the all-important figures. This then is a good time to stop writing and get back to building.

 Part 2
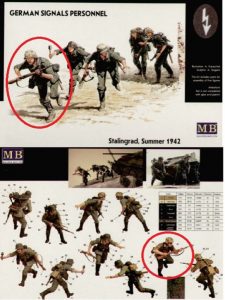
Some figure work was necessary so as not to be left behind on the build schedule. As the diorama had been constructed some key figures were roughly assembled to ensure good fitment into their respective areas. The main set of figures was from ’master box’ (MB) set ‘German Signals personnel’ Stalingrad summer 1942. That should have made life simple but a number of things became apparent. Firstly (and one that wasted an un-necessary amount of research time) was that one of the figures in the box did not match fully the artwork, and worse, from my research did not even match the period. This was a shame as I’d already made the figure and really liked the pose, having a place for it. You can see on the box art I’ve circled that the figure running at the high port is in a field grey tunic, but on the rear of the box, also circled the figure comes in a camouflaged smock. I figured that MB would have done their research so confidently glued it together. However, after an extensive search of pictures no Heer soldiers appear in smocks at this stage of the war, only some SS units had camouflage, It was not likely to have a lone SS assaulting with Heer Wehrmacht soldiers so I ended up deleting this figure. It also threw up the fact that many internet pictures are mis-labelled.
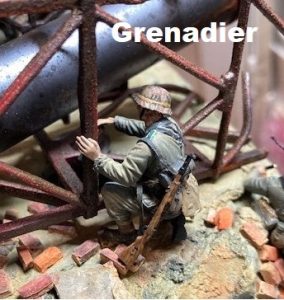
 Now I should state that I really am a fan of the MB figures. They are very well thought out and display great poses. But this box also had some disappointment as the parts had obvious flash around many parts. The detail in the figures is added by the separate extremities of the jackets so that there is a proper gap between jacket and trousers. The other figures I used on the diorama came from Dragon and Hobbyboss (these HB figures are the old Tristar ones) and a lone Verlinden Resin Tank commander. The Verlinden figure was lovely, only two parts that needed plugs removed which I then painted before gluing as it made life easier. As I cut the plugs of the old familiar smell of Verlinden resin wafted up- nostalgia indeed. The prone position figure was a combination of figures and a little Milliput as was the grenade poster. This was the Dragon figure that was meant to hold a pistol, I removed the plastic hand and reamed out the cuff before inserting a pin for an open-handed Hornet replacement and a barely touching stick grenade. This figure will be placed amongst the gantry throwing a grenade down an open manhole.
Life color’s [sp] recent Field Gray Uniform set was used for the majority of colours. I tried to pre-shade with white sprayed down from the top after priming in black. It did make a marginal difference so I think I need to work on my technique.

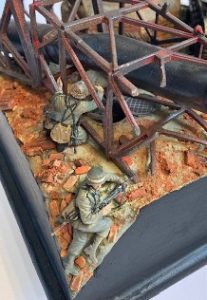
Throughout I have been keen to pose the figures really interacting with their environment (sorry if I’m labouring the point). But as anyone who models 1/35 knows, figures do sap time so I was bouncing in and out of the modifying and painting yet it came to a point where I needed to bring together a number of items, the Gantry and the figures at that corner as well as the pipe all simultaneously to enable the diorama to move forward. The prone figure on the slope at the corner was first in line; modifications were done to his right leg to turn it inward as well as swapping out personal equipment to ensure it sat correctly. A fist was drilled out to accept a magazine cut from a MP40 to have the figure conducting a ‘Mag’ change. A touch of gold paint on the top  highlights the 9mm rounds. Constant checking meant only minimal additions to groundwork were needed all done with individual 1/35 plaster bricks and some pigment powder. After that the Gantry and the Grenade posting soldier were positioned ensuring the throwing pose lined up with the open manhole. I used 5 min epoxy to get a good bond even though I was only having minute amounts at the points the gantry came into contact with the ground. Sadly the pose hid a lot of the figures detail as he is sporting stick grenades tucked in his belt. The cloth covered helmet was challenging but the use of an ultra-fine pen helped get the unique camouflage scheme nailed. A lead foil substitute was cut into very thin strips (my first attempt seemed thin enough but once in place looked wrong) and used to make the rifle and MP40 slings. Fitting these took ages, but joints with super glue that were very fragile. Take time to do your research to identify where the sling swivels or other attachment points are. Having just returned from visiting the museum in Dunkirk I had a couple of excellent pictures taken to show just that. I was pleased to get the figures in place, it meant no more accidents in handling as I was getting tired of re-attaching slings, heads or water bottles, not helped by the wish to use the tiniest amount of glue to keep it all neat.
 Whilst this corner progressed, I also worked on the easier lower-level side of the diorama. In part one I showed the 120mm Russian mortar assembled. Now it was given a basic paint in dark green with shadows added in dark umber ink. I then did some micro painting for chips and wear as well as adding fine chain for extra detail.
I suddenly had a thought; I’d spent a lot of time researching the German elements without a thought of whether the 120mm Mortar by Zvezda fitted the diorama’s time span. Thankfully I didn’t need to worry, the following is an abridged extract from Wikipedia.
The 120-PM-38 or M1938 was a 120 mm Soviet mortar that was used in large numbers by the Red Army during WWII. A conventional design, its combination of light weight, mobility, heavy firepower and range saw its features widely copied. It’s origins lay in the French Mortier Brandt de 120mm Modele 1935 and the Brandt Mle 27/31 which the Soviet Union produced under license as the 82-PM-36. In 1937 the Soviets produced a modified version of the 82-PM-36, this mortar served as the pattern for the 120-PM-38. The main difference was the adoption of a round base-plate, revised traverse/elevation controls, simplified sights and spring-loaded sh ock absorbers on the bi-pod to reduce the amount of relaying needed between shots. Mounted on a handcart, this manual limber is wheeled vertically into place, hooks on the base-plate hook onto the limber, the barrel is clamped down and then everything is lowered into towing position or the procedure in reverse for pla
 cing in position. The limber can either be towed directly or attached to a 20-round caisson for towing by a vehicle or horse team. The Germans captured large quantities of Soviet hardware including the 120-PM-38 which they designated the 12 cm Granatwerfer 378(r) and eventually produced a modified version called the 12cm Granatwerfer 42 which was widely issued to German and Axis units. The picture reproduced here also gave me details on how the ammunition was laid out for use. And it’s proximity to the mortar tube. I have already written a review of the AK Wooden ammo boxes in October 2022 club newsletter, but they added a level of finesse better than the kit parts supplied by Zvezda. The AK set was meant to portray German containers so I had to do some cutting and re-modelling to make the type suited for 120mm mortar rounds. Once in position I could add splinters and broken parts around the advancing Panzer III. Weathering will be light as ammo should be stored carefully.
I do like the touch of colour the ‘Air recognition flag’ adds to German vehicles but being a Swastika that can cause some to find offence. My way around it is to always have them slightly creased and folded so that the complete ‘hooked cross’ is not visible. My normal process is after washing out any scent or moisture from a ‘wet wipe’ to cut it to size and draw a circle in the centre with the cross marked in pencil. Dilute PVA is liberally applied to settle into the texture of the wet wipe and the material placed onto the hull of the tank.
After lea ving 24 hours to dry I then undercoat in a dark reddish brown leaving the centre circle unpainted. Once the undercoat is fully dry, the red is done as a top colour, I find it is a richer red over a brownish undercoat and can easily have shadows added while wet. Once the red is dry the white centre is painted, and being white is just about shows through the pencil cross that then is done in black with the Swastika hooks added by eye. Normally a simple process of steps but as my picture shows an extra step was needed after I dropped a big blob of undercoat on the flag.
The beauty of Vallijo acrylic became apparent as I took the whole tank hull over to the sink and ran it under the tap to remove all the excess. Left over night there was no hint of the spill and the task was continued without problem.
Final Part
I think it shows in the first two articles how much I was enjoying the diorama, the results of each phase were very pleasing. It was a fun Club Group Build (GB) but the problem with a GB is deadlines, and I did not want to compromise the way this ‘Stalingrad’ Diorama was progressing in order to finish in time.
I’m also renowned in club circles for getting sidetracked by new projects so when the GB reveal date arrived I brought along where I’d got too as a work in progress then promptly put it to one side.
I’m glad to say that my New Years resolution for 2023 was to complete as many ‘part starts’ as possible. So here is the final instalment.
After a dusting off with a large soft brush I decided to break down what was left to achieve into 4 areas.
- Figures
- Chimney
- Finish Panzer III
- Assemble all elements.
Finishing the panzer seemed easiest but as you’ll read it opened a new avenue of work!
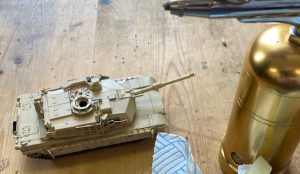
I added some resin stowage, Tasca Jerry cans (which are wonderful in detail including PE) as well as the remaining details from the Dragon kit such as Jack block, crowbar, antenna mount and shackles. I ditched the kit MG for beautiful turned brass MG tips by RB. Spare track links and securing bar were added to the front end.

Having the hull separate from the top deck made moving around the vehicle and adding the details easier. I also decided to add the markings preferring to paint them.
I’d always said this was to be a Stalingrad diorama, often the immediate thought is of the snow and desolate 6th army, but the dress of the figures I was working on moved the time frame to the early months of Stalingrad and the break in. cross referencing locations and equipment meant my vehicle and figures would belong to 24 Panzer Division.
From Wikipedia: The 24th Panzer Division was formed in late 1941 from the 1st Cavalry Division based in Konigsberg. The division fought on the Eastern Front from June 1942 to january 1943, when it was destroyed in the battle of Stalingrad, it once more returned to the Eastern Front in late 1943 and remained until it surrendered to Soviet forces in May 1954.
When the 1st Cavalry Division’s colours were retired it symbolised the end of the German Army’s cavalry arm. As a tribute to the old ways, the 24th Panzer Division retained the nickname ‘the Leaping Rider Division’ and until late 1942 used this image as it’s divisional symbol. Replaced 1943 onwards with a simplified tactical symbol.
 |
Leaping Rider replaced post 1942 by
Due to the Stalingrad timeline the Leaping Rider was chosen, and hand painted on. |
 |
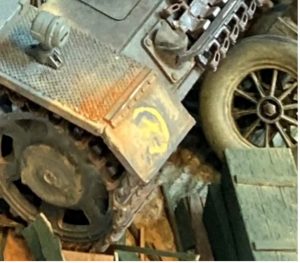
In honour of the Division’s mounted origins, the 24th Panzer’s tank crewmen wore the golden-yellow piping on their epaulettes instead of the Panzerwaffe pink, this caused me a problem as I had already painted the ‘Waffenfarber’ in pink. Even the Panzer grenadiers attached to the unit wore the same piping so a very careful touch up with an ‘Army Painter’ Psycho brush was needed.


 Resuming work on the remaining figures followed naturally after the re-paint. I enjoy working on figures but it is rather slow, individual accoutrements require a range of colours and to be mounted to lie realistically not just in relation to gravity but in suitability of use and comfort for the soldier despite it being just a model. To that end I used Milliput to supplement the kit supplied bread bags and gas capes where the kit plastic didn’t conform adequately to the shape it was lying against. Adding slings and straps really slows things down but necessary especially on rifles. Lead foil is still great for achieving this, but the silver edge is prominent as seen in the MG figure, so touching up the paint is required even though the foil had been pre-painted before cutting.
One element that I was not so happy with was my face painting on the 1/35 figures. I decided to invest in a set of Vallejo Game Air Face painting (set 72.865) comprising of 8 x 17ml bottles. These are designed for airbrush and best suited to larger busts but I figured the thinner nature of the paint would be useful as I was working at 1/35 scale using regular brushes. I primed in brick red enamel paint followed by a light coat of enamel flesh.

I like having a tough resilient base to build acrylics onto hence the enamel base layers. The next layers are built up using small dabs blended on the surface following the colours listed in the Vallejo guide finally highlighting the brow crease, nose and chin. If to stark knocking back the chin with a little grey ‘5 o’clock shadow’ alleviates the contrast. For open mouths I find mixing dark red with flesh is a good starting point.
As the figures were completed preventing them getting damaged became pressing as for some reason I kept dropping them when test fitting into their various locations and I was getting fed up of re-attaching slings. I drilled each figure with a single short length of wire and this really helped secure each one and allowed poses to be achieved that had only limited contact points such as the debussing grenadier from the Panzer. Obviously I should have done that at the beginning, it would have been so much easier when handling for painting.

 The chimney was a two-part resin item that I coupled up to a plaster kiln base from Fields of Glory. I don’t recall where the resin element came from, and it’s been waiting for about 15 years in my box of bits to get used. The two parts of the chimney tube were keyed to ensure correct alignment but I fear that over the years the corners had rubbed off a little so there was a small amount of play in the parts. Annoyingly despite thinking I’d lined both parts up and glued them correctly with slow setting epoxy after 24 hours and a very strong join I noticed a slight kink in the profile of the chimney. Annoying but to eliminate the noticeable kink would have taken a ton of sanding and almost impossible re-scribing of brick work. Impossible I felt to match the existing pattern and depth of the inscribed brickwork. The solution was wonderfully simple and added an extra detail. I used strips of plasticard with rivets punched in to replicate the metal securing rings found on many chimneys. Taking the kink as the first ring to be placed I added a further two equally spaced from the 1st.
The whole column was undercoated in earth brown then the base and top airbrushed in black. I then selected 3 Vallejo ‘model color’ paints- Orange, Brick red and Tan yellow as well as black and used many varied mixes of these occasionally darkening with the black to randomly pick out the brick detail. The thin consistency of the acrylic allowed the pre-shading to show through. Once done the overall look was too clean but coating the whole thing in sand pigment that was then rubbed from the brickwork, but left in the mortar lines blended the individual bricks. Black pigment was added around the top of the chimney. Gun metal was used to pick out the bands with rust added and streaks of white to replicate visiting bird deposits.
While the chimney stack gave some welcome height to the diorama it would be susceptible to knocks and would make transporting the diorama more difficult. This was sorted by having the chimney removable. After finding a suitable length of metal rod a sleeve from aluminium tube was found that was almost a perfect fit. I drilled into the resin and glued the rod using black CA which is able to absorb a small amount of movement. After leaving a while to ensure really set, it was placed over the plaster kiln so the rod dug into the interior plaster. This gave me the exact location to drill the larger hole needed for the aluminium tube. Once in place and the rod inserted once agin everything was left to dry for a strong coupling. There was now a obvious step where the kiln and chimney met.
I cut a length of plasticard to make an internal collar to the kiln that was not glued in place. Black Milliput was mixed up and a sausage wrapped around the chimney base. Using a hard bristle brush the epoxy was rammed down so it spread outwards to create a tapered ledge that filled into the gap and up to the collar. Brick dust particles as well as tan coloured pigment was worked into the putty as the ramming motion was conducted. Once happy the Milliput putty was left to dry, the ladder was added at this point taking advantage of the soft putty (later plastistrut details were added to tie the ladder to the chimney bands). Once dry the chimney was pulled up bringing the putty collar with it. It now could be replaced at will and always keying into the same place for orientation.
As with the bands, the ladder was painted gun metal with some rust added.
 |
 |
 |
Now final assembly could be conducted which was swift due to the previous continuous checking of placement of the figures as I had stressed from the start, I wanted the figures to really engage with the scenery. Only a year overdue but very much completed.